


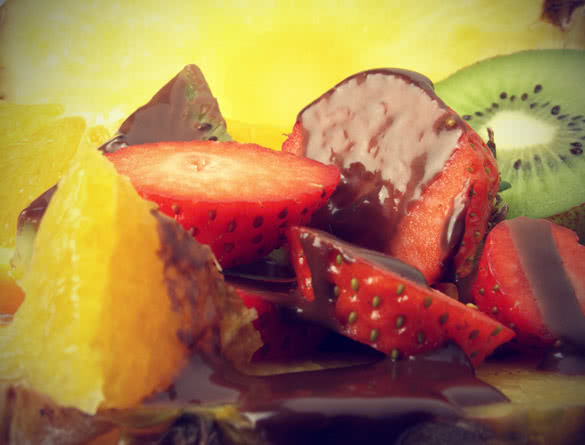
Who doesn’t love chocolate and fruit? Most people think of it as a special treat but making chocolate dipped fruit is actually very easy and very impressive to your guests.
Is there anyone out there that doesn’t like chocolate dipped strawberries (and isn’t allergic to strawberries)? Summer is the ideal time to indulge in this treat but don’t stop at strawberries. Pick a cornucopia of your favourite fruits and break out the chocolate.
Personally, I love apples, strawberries, raspberries, and chunks of banana. Any fruit will work though. The trick is to make sure its dry before you dip. Chocolate covered fruit is also a great way to top a cake or pie.
If you plan on doing some decorating, you can also consider using candied citrus peel.
Types of Chocolate
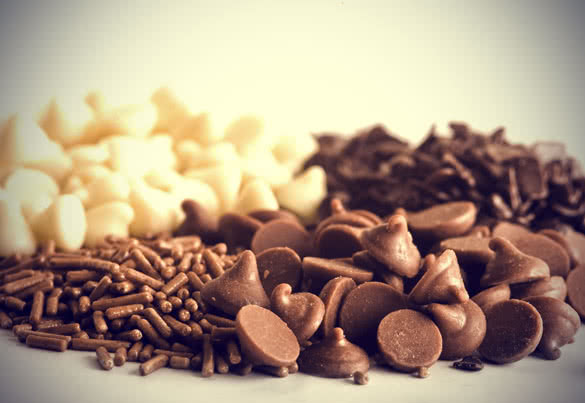
Virtually any kind of chocolate can work but the better quality, plain chocolate bars can definitely be a bonus in the taste department. If your budget is limited, chocolate chips will still satisfy. I like to do some with white chocolate and some with milk chocolate.
Dark chocolate is an option too; I’m just not particularly partial to it. I prefer to avoid bars with nuts and other items already added as most of them sink to the bottom of the dish and I just make a mess trying to get them on the berry. Better to roll your berry in toppings afterwards.
Toppings
You can leave them plain or decorate depending on how fancy you want to get. Fun decorations include caramel drizzle, another type of chocolate dribbled on top, sprinkles, flavoured coarse sugar (cinnamon sugar is good!), crushed nuts, and graham crumbs.
If you’d like to dye the white chocolate make sure you use an oil-based food dye like Wilton’s or just buy Wilton’s coloured baking chips. Water-based dyes will cause the chocolate to seize up and it will be useless for dipping.
You can even double dip them although that takes a fair amount of time as they need to dry in between dippings.
Recipes: Chocolate Dipped Fruit
Ingredients:
- 24 oz (2 bags of chips) of chocolate, you can divide this into as many varieties as you’d like
- 2 pounds of fruit, washed and completely dried – air drying works best but feel free to pat them dry if you are in a rush
- 4 TB canola oil
Toppings
Set out any toppings you intend to use in a way that makes it easy for you to submerge, roll or dunk the fruit. I like plates for rolling but some people prefer bowls. Line a cookie tray with parchment or wax paper.
For each cup (8 oz) of chocolate, add one TB of canola oil. Remember, you only want to work with one type of chocolate at a time. The dipping chocolate mix will need to be kept warm to stay liquid so you don’t want bowls sitting around on the counter waiting to be used.
Heat the chocolate and canola oil in a microwave safe for 20-30 seconds. Check and see how much as melted. You want it to have lost form but not much more than that because it will melt the rest of the way as you stir it. You can keep heating it in short 20 second intervals until it reaches the right liquidity. If you are using white chocolate and want to dye it, add a few drops of dye once it is ready to use and stir.
Dip your fruit into the chocolate. You can fully or partially dip it. Use toothpicks if you’re having a hard time holding it. Once it is dipped, if you intend to decorate it you need to do it now. If you intend to leave it plain, just put it on the parchment paper and move on to the next piece.
If your chocolate starts to thicken and gets difficult to dip into, put it in the microwave and reheat it for about 20 seconds. You can reheat it as often as needed. Once you’re finished, put the tray in the fridge until the chocolate sets and hardens.
Chocolate Dipped Pineapple Slices with Toasted Coconut
This is one of those easy to make chocolate dipped fruit desserts.
These simple Chocolate Dipped Pineapple Slices with Toasted Coconut are the perfect tropical treat!
-
1 Pineapple, fresh
-
1 cup Coconut flakes, toasted
-
1 12 oz. bag Ghirardelli dark chocolate melting wafer
Candied Citrus Peel
Candying peel for dipping takes a lot of time but it isn’t difficult. The results are quite tasty; the citrus tang really compliments both milk and dark chocolate. It also looks super impressive when you use it on desserts. I like the peel both with and without chocolate.
- 3 navel oranges or 4 medium lemons
- 1 ½ cups white granulated sugar
- ¾ cups of water
Peel the fruit. You want to keep the rind including the white pith. The easiest way to do this is to cut the ends off of the fruit and then score the skin into quarters. Gently peel the skin of each quarter back from the fruit. Don’t worry if it tears, you’re going to cut it up later anyway. Once you’ve peeled the fruit, cut the rind into thin strips, about ¼ inch wide. Keep the fruit for snacking later.
Put the rind in a deep pan and cover it completely with cold water. Bring the water to a boil on high. Once it hits a rolling boil, drain off the water and repeat the process twice more. You want to really soften up the rind. In a separate bowl mix the sugar with the ¾ cups of water.
Once the peel has been brought to a boil and drained three times, set it aside in a bowl. Add the sugar water mixture to the pan. Bring it to a simmer and keep it simmering for about 8-9 min. Add the peel to the pan and make sure it is covered by the sugar water.
Keeping it at a simmer, you’re going to leave it for 45 min to an hour. Try to avoid stirring it as that encourages crystallization. Swirl the pan to cover stray pieces of peel instead. By the end of the hour, the peel should look translucent.
Line a cookie tray with parchment or wax paper. Remove the peel from any remaining syrup, keep the syrup though. Lay the peel out on the lined cookie tray and let it air dry for 4-5 hours. Once it’s dry, it can be dipped in chocolate if desired. The remaining syrup is just flavoured simple syrup and is a great addition to tea or your favourite cocktail.
Have you already tried to make some of these chocolate dipped fruit treats?
Impress your partner
Chocolate covered strawberries, for example is one of the most favorite easy romantic desserts.
n essence, romantic desserts don’t need to be the complicated debacles they appear to be. There’s no pomp or circumstance to it. All it takes are simple ingredients, a little bit of time, and a LOT of love.
Try one of these simple recipes and enjoy the delicious, indulgent result with the one you love the most.


Add Comment