


I’m sure most of you have curled your hair before, but there’s no way you’ve curled your hair in all the ways we’ve listed here in this master guide. Keep on reading to learn about heatless curling, blow dry curling, and new ways to curl with a wand.
Heatless curling
Heatless curling is the best option for those with damaged, chemically-treated hair, or for anyone who doesn’t want it to become damaged. These amazing heatless curling options will keep your locks looking great while giving you the curls you desire.
Just remember to make sure your hair is only damp; if it’s too dry the curls won’t curl at all and if your hair is too wet, the curls won’t dry.
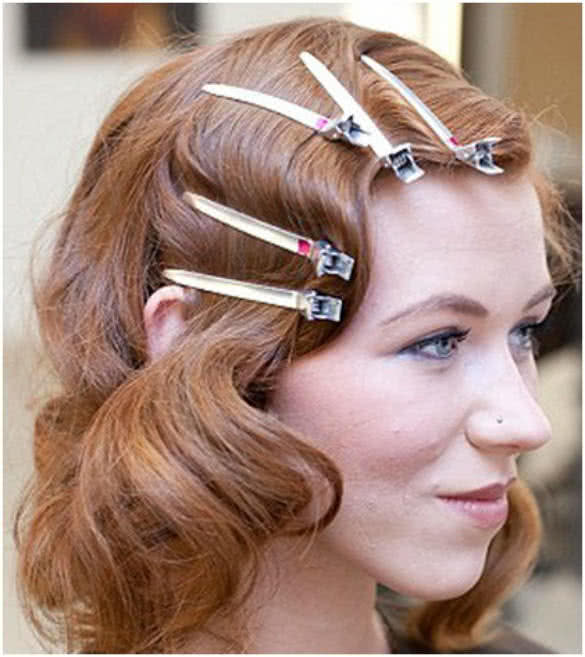
Flexi rods
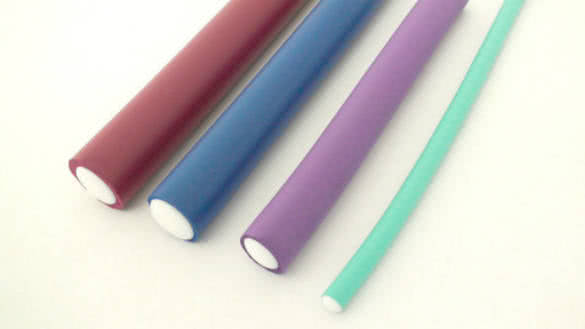
Flexi rods are a really easy, classic way to curl your hair. They are essentially long sticks wrapped in foam that you wrap your hair around to make curls. The rods come in all different sizes so you can achieve whatever size curls you want. There are quite a few different methods you can use to wrap your hair around the rods.
Beachy Waves: Section your hair in two sections. Twist small sections of your hair and then wrap around the flexi rod. Once you get to the top of your head, twist the ends of the flexi rod toward one another to make a circle and secure your hair in place. Play around with smaller and larger sections of hair to get really authentic looking beach waves. Once the hair is dry, carefully remove the rods and brush curls out with your fingers.
Tight, Girly Curls: Tie up the top 2/3rds of your hair into a bun. Section the remaining portion into two sections. Start with 2-3 inch squares of hair and lay flat around the flexi rod starting from the bottom and then roll up to your roots. Once you get to the roots, wrap the ends of the flexi rob toward one another to secure your hair in place.
Repeat and take down hair from your bun as needed until you finish all your hair. Do not remove until completely dry. When the hair is dry, slowly unravel the rods and separate the curls with your fingers. Do not brush.
Curlers (regular)

There are tons of different types of regular curlers (Foam, Velcro, etc.) that can help you achieve any kind of curl style you’re looking for; from old Hollywood glam to beach waves. It doesn’t matter which form of curler you use. You can achieve the same looks no matter what you choose. What sets the styles apart is where you place the curlers around your head.
For a basic, all-over, voluminous curl: Use about a 1-1 ½ inch curler for medium length hair. Starting from the hair framing your face, take 2 inch block sections.
Start from the bottom of the hair and roll towards your face. The curlers should be vertical rather than horizontal. Secure with a bobby pin or roller clip. When the hair is dry, gently release the curls and spray with hair spray. Once the hair spray is dry, comb your hair through with your fingers to separate the curls.
Braids
Braids are probably the easiest way to curl your hair. The effect is more of a beach wave depending on how many braids, what size they are, and how tight you braid them.
You can get a really beautiful, face-framing wave if you part your hair in two sections, start by doing a French braid around your face on both sides and then finish off both sections by braiding all the way down the hair. You can tie the braids back into a ponytail or bun while you sleep to keep the hair from becoming frizzy.
Headband curls
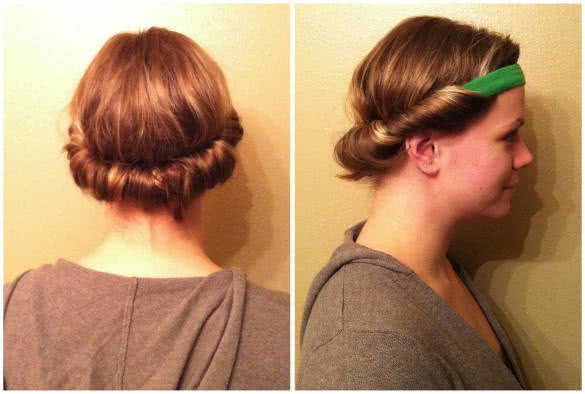
This method is my favorite by far. It is so simple and comfortable to sleep on. You will get super bouncy and full curls. Here are some great instructions from wikihow to teach you how to do this awesome style:
- Brush out your hair and make sure there aren’t any tangles whatsoever.
- Get a wide headband, preferably about the width of two fingers together. Put it around your head; the middle of your forehead should be the approximate placement.
- Gently pull you hair so it’s completely flat all around.
- Split your hair into three sections, the left, middle, and right sections. The middle section shouldn’t have too much hair, and should be at the back of your head. Brush it out once more.
- Start with the front of your head, on one section of your head. Take a section of hair at the front, and wrap it around the headband, coming towards you. (If you were looking at it, it would be counter-clockwise)
- Take that same section of hair after it was wrapped around, and as you wrap it around the headband, take some more hair like what you do when you make a French braid.
- Once you finish one section on your head, do the same thing on the opposite side. (So if you just did the left, do the right. and vice-versa)
- After you finish the left and right sections, do the middle, which would be at the back of your head. Take the whole section of hair and keep wrapping it around the headband.
- When you are finished, you could sleep like that overnight, or leave it in for at least 5 hours.
- After a period of time, gently and slowly take out the headband making sure you don’t tangle your hair with it.
- Finger-brush your curls so that they aren’t as individual as when you wrapped it.
- (Optional Step) Spray hairspray around your head to have the curls last longer.
Twisted buns
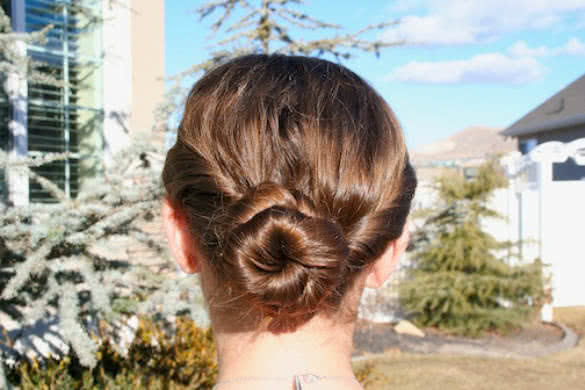
This method is a less comfortable one to sleep on, so it may be best to use it in the morning on damp hair rather than before bed. For this method, you’re going to section your hair into 4 or 6 sections depending on how much hair you have. Twist each section into a very tight bun and then secure with bobby pins.
You can speed up the drying process with a hair dryer on the cold or warm setting. It is particularly important that your hair is not too damp before you use this method because the buns will keep a lot of moisture in.
Pin waves
Pin Waves are only for the truly talented. It takes some time before you get it right, but once you get it, you’ll never want to go back to regular curls again. Here is a perfect pin curl how to from wikihow:
- Wash your hair. You need to start off with wet hair for this style to take hold, so go ahead and wash it using your favorite shampoo and conditioner.
- Blot it dry. Don’t entirely dry your hair; just blot it gently with a soft towel, making sure it’s no longer dripping wet.
- Apply gel. Any type of strong-hold hair gel will do. Use a liberal amount toward the top and front of your hair, where the finger waves will be, and spread a smaller amount throughout the rest of your hair.
- Part your hair. Use a fine-toothed comb to create a deep part on one side. Extend it back further than you normally would, so it almost reaches the crown of your head. Make sure it’s nice and straight.
- Comb your hair forward on the bigger side of the part. Leave the other side of the part, the smaller side, untouched for now. Comb your hair straight forward on the larger side.
- Place your forefinger parallel to the part and press down. You want to align your finger with the part and press down to keep the hair right next to the part in place.
- Comb the hair next to your finger back. This is a little tricky. Keep your finger firmly in place, so that the hair underneath it stays in its forward-combed position. Now take the comb and use it to comb the hair right next to your finger backward, so it’s going in the opposite direction of the hair under your forefinger.
- Position your middle finger next to your forefinger. You’re using your middle finger to hold the hair right next to your forefinger in place.
- Pinch the two fingers together and secure the hair with a metal wave clamp. The hair that lifts between your fingers is going to become a finger wave. Hold it in place with one of the metal wave clamps. The clamp should run parallel to your part.
- Make more waves. Comb the hair right next to the clamp forward, and hold it there with your forefinger. Comb the hair next to your forefinger backward, and hold it there with your middle finger. Pinch your fingers together and secure the hair that lifts between them with a metal wave clamp. Keep making waves until you’ve created waves down the top of your ear.
- Wave the hair on the other side of the part. Do the same thing to the other side, using your fingers and the clamps to create waves all the way to the top of your ear.
- Let your hair dry. Your hair should completely dry in the clamps. Don’t take them out while your hair is still wet, or the waves will fall out.
- Consider the rest of your hair. The finger wave is typically only done to either side of the front of the hair. The rest of your hair should also be styled to create a polished look. Choose one of these options:• If you have long hair, create soft curls. After you’ve put the clamps in and while your hair is still damp, roll the rest of your hair up in curlers.• Do a bob. If your hair is short, you can curl the rest of it under using a few large curlers.
• Make a chignon. This is a pretty way to style your hair, too. - Remove the clamps. Gently un-clamp your hair to reveal your new finger waves. If your hair is totally dry, they should stay in place.• If you put curlers in your hair, take those out as well.
• Don’t comb your hair or the waves will get loose. - Spray your hair with hairspray. Make sure your look stays in place by using hairspray to secure it. Spray the front and sides of your hair.
- Add some 30s flair. Do 30s-style makeup, and put on a 30s-style outfit. Your look is now complete.
Curls with just a hair dryer
Curling your hair with a hair dryer is another great option. It eliminates the curling iron and still gives you the curls you love. You can add a hair dryer to any of the heatless curling options to speed up the process or choose one of the great options below. If you don’t want to completely dry your hair with a hair dryer then air-dry your hair until it’s nearly dry before beginning the process.
Hair dryer and round brush
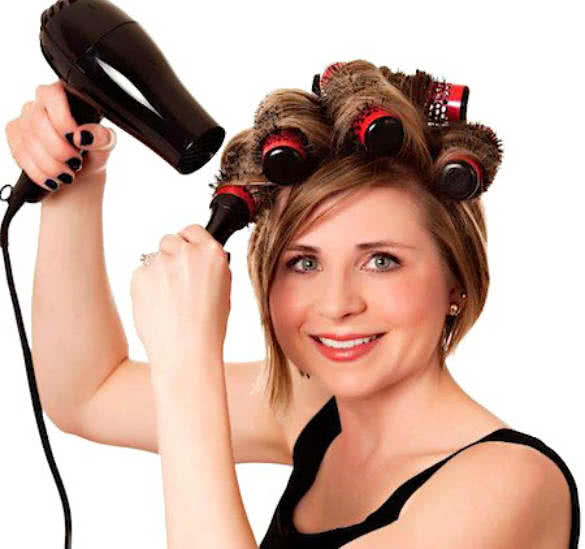
You can use a hair dryer and a round brush to get soft, bouncy curls. Use a round brush with a barrel size of about an inch. Comb through the hair until you reach the end and then start rolling up. Hold the hair dryer on the hair until it is dry and then gently unroll and release the hair from the brush. Repeat all over the hair until it’s dry.
Hair dryer and regular brush
If you don’t have a round brush or you just want really soft and loose curls, you can use a regular brush and a hair dryer. Simply comb through your hair with the brush until you almost reach the ends of your hair. Then, start twisting your hair by twisting the brush and blow-dry the section of hair.
Heat styling
Styling with a heated instrument is the most damaging way to curl your hair. Make sure that, if you are going to heat style your hair often, you invest in quality instruments to cut down on the damage. If possible, let your hair air dry before heat styling and use a quality heat protectant.
Using different barrel sizes intermittently
It may seem like a lot of work to have 2 or 3 different size barrels going at one time, but you’re going to love the effect! Use barrel sizes that are close together such as a ½ inch, 1 inch, and 1.5 inch. Then, curl different size block sections of the hair in different directions (some away from your face, some towards your face) until all your hair in curled.
Use hairspray to set the hair in place and you’re done! (You can twist your hair around the barrel or clip your hair in the barrel, but make sure for each barrel size you use the same method or it might look messy and out of place.)
Pony tail curls
This method is super-fast and easy. If you’re in a rush, this should be your go-to curling trick. With dry hair, put your hair into a lose ponytail (don’t pull too tight or you might get a crease). Take sections of your ponytail and curl them.
Once you’re finished curling all of them, release the hair from the ponytail. You may have to fix some areas around the face, but that’s a small price to pay for how quickly you just curled the rest of your hair!
Tapered barrel curls
The tapered barrel took the beauty world by storm. It allows you to create lose waves by the root and tighter waves towards your ends. Simply take flat or twisted sections of hair and wrap them around the tapered barrel wand until all of your hair is curled.
Hot curlers
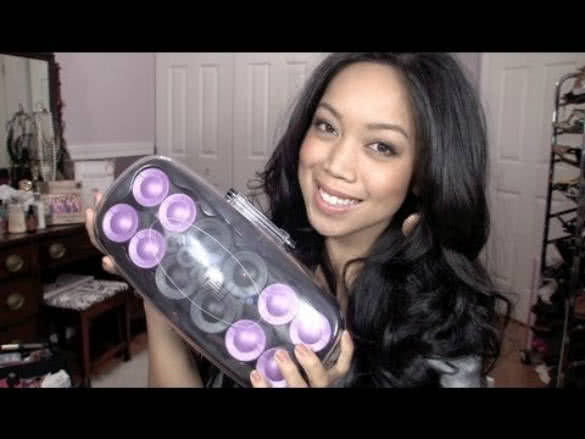
Hot curlers are a great way to get the bouncy Hollywood curls you’ve always dreamed of. You can use many different size curlers or just one size. For a cleaner, Hollywood glam look follow the steps in the “regular curlers” section above.
However, only use these hot curlers on completely dry hair and do not take them out until the hair feels cold to the touch or the curls will not stay. Pull them out slowly and spray with hair spray before you brush them out with your fingers or a comb.
How to curl your hair with a straightener
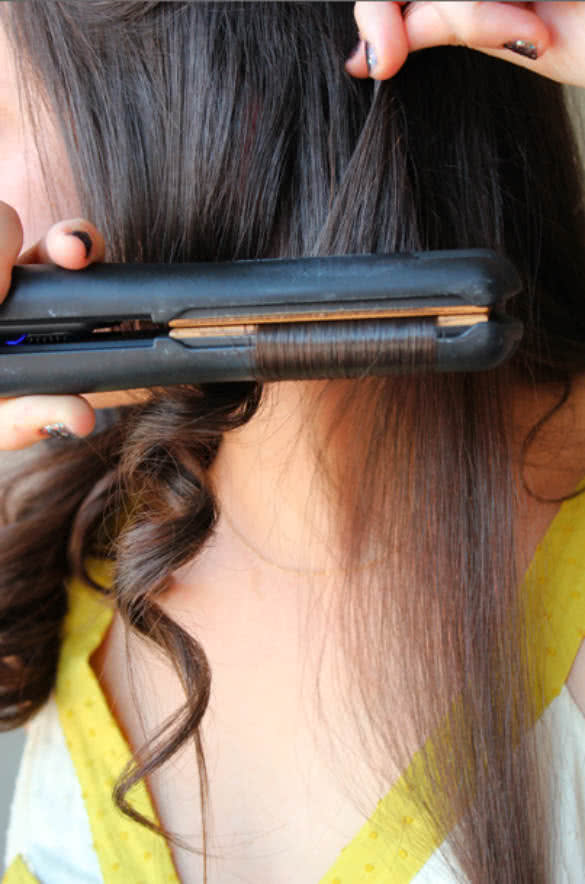
Curling with a hair straightener is fast and easy. Here is a really simple how-to from instructables.com to help you master this trick.
Their tips:
- Wrap as if you were using a curling iron (don’t close the flatiron completely).
- Use less heat for blonde hair and scale up as hair darkens.
- The way you can tell if you’re putting enough heat in with the flatiron is to
feel your hair. It should feel warm, which lets you know that the heat is reaching all of the hair. - Can’t put too much hair in at once, or it’ll be too tough to curl
- Don’t do the tips of your hair until the end, as they require the least amount of heat to retain the curl.
- Get your supplies. You will need a hair straightener, oil sheen spray and a hairspray of your choice.
- Comb out and pin up hair. Take half inch section from the nape of her neck, spray with oil sheen. Oil sheen helps with the glide of the flat iron over the hair. Go ahead and smooth the oil sheen through the body of the hair.
- Take flat iron and use it underneath your hair. You will be twirling your wrist around while holding the hair with your other hand when making the turn. So you are turning the flat iron, not the hair around the flat iron.
As you can see in these gifs, you aren’t wrapping all of your hair around the flat iron like you would with a curling iron. Instead you wrap just part of the hair and slowly and carefully pull it down the length of the hair. - Flat iron up: This method helps you get “Beach body wave curls,” a looser curl that falls down your back. So instead of pointing the tip of the flatiron down, point it up, angling up (the angles do the curls).
Keep hair centered in the flatiron to avoid snags. Once you have it all wound around the flat iron, carefully unwind. If the curl comes out too tight, you can run your fingers through it to loosen it up.
Unlike the other curl, you wrap all the hair around the flat iron and then carefully unwrap it. - Finished. To finish off the look, spritz with Kenra. You can also use oil sheen, comb top part of hair to smooth it out.
Curl with a 3-prong crimper
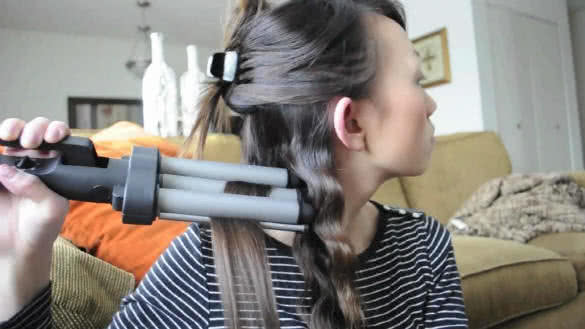
Don’t worry, we’re not telling you to get all 80’s on us. There are some really awesome 3-pring crimpers that give you big waves. They end up looking really beachy and messy. Start by tying up the top 2/3rds of your hair into a bun. Then split the bottom portion into two sections.
Start crimping from the root. Start as close to the root as you can. Place a flat section of hair in between the crimper and then close. The hair will move and shorten as it fits to the folds of the crimper.
Unless your hair is really short, you will probably need to do more than one crimp per section. When you place the crimper to do the next section, line up the first prong with the last wave in the crimp you just made. This will ensure that you get a nicely flowing strand of waves. Repeat for all sections of hair around your head.
Pull and wrap method
This method of curling uses a regular barrel hard curler with a clasp. Start by sectioning the top 2/3rds of your hair on top of your head in a bun. Section the bottom portion into 2 sections. Take a 2 inch block section of hair and place inside the clasp of the curler.
Starting from the root going to the tip, gently pull the hair curler down while you twist it all the way down the hair section. Do small sections and pull more hair down from your top hair bun when you are ready. When you are finished make sure you set with hairspray. Since these curls are very lose, it is easy for them to come out if they are not set properly.
Other ways to use a regular hair curler:
- Place a flat strand of hair inside the curler from the bottom and roll it up. The hair should lay flat against the curler. Continue all around the head. You will get really tight curls by using this method, but you can also comb them out to get looser curls if that is what you want.
- Wrap hair around the barrel without using the clip. Most people will use a clipless curler for this, but curlers that have a clip work just as well. Contrary to what some might say, you will not get a line on your hair from the clip! This is probably the fastest way to curl your hair with a hair curler.
- Flat iron waves. Pull your flat iron in an up and down motion as you pull down on the hair to create waves. This is a bit of a time consuming method, but it gives a beautiful result!
Hair tips and tricks
Proper hair care will make it easier to style your locks and it will hold much longer than damaged hair.
- No-Poo or the Curly Girl Method is a method of washing your hair where you don’t use shampoo. You only use conditioner. Well, sort of. There are tons of great “no-poo” natural products out there that cleanse without stripping your hair of its natural oils. They are also a lot more moisturizing than traditional shampoos and conditioners. They do not contain alcohol, sulfates, or parabens. Those ingredients only dry out the hair and make the scalp produce more oil so you have to continually wash your hair. Many people who follow the No-poo method claim to only wash their hair every 3-4 days. (DevaCurl No-Poo may be a good option for you.)
- If you have extremely straight, hard-to-curl hair try a texturizing spray, curl on 2nd or 3rd day hair. Make sure to use a hairspray or a wax product after you’ve finished curling as well.
- Do not wrap your hair with a towel when you get out of the shower. Towels have harsh fibers that easily damage wet hair. Instead, use a silk or satin pillowcase to wrap your hair!
- The brush matters. If you must brush, don’t brush your hair when it’s wet or damp. Only brush completely dry hair and use either a boar bristle brush or a wooden brush. These types of brushes can carry the oil from your roots to the tips of your hair.
- Oil mask therapy is great. If you haven’t started using natural, organic, cold-pressed, unrefined vegetable oils in your hair care routine then you’ve been missing out on some seriously amazing benefits. Use oils like avocado oil, castor oil, coconut oil, olive oil, and sunflower oil to care for your hair before, during, and after washing it. It will refresh the texture if your hair starts to get dry between washes or you can leave a bunch on for a couple hours once or twice a week for an extreme oil mask. You’re going to love it!
- Sleep on satin or silk pillowcases. This one is a no brainer. Sleep on a satin or silk pillowcase to cut down frizz and breakage from sleep.
- Tie your hair up while you sleep. Tying your hair up will keep the ends from being exposed to your tossing and turning. Less ends exposed=less breakage.
- Don’t throw your hair curlers out. If you have decided to switch to heatless or less-heat styling techniques then don’t throw your hair curlers out! You can use the hair curler in its offsetting to hold damp hair in the curl form while you blow dry it! The clip will help you hold the hair in place while you do it. Brilliant!
- If your hair will not hold a curl, use bobby pins to secure the curls on your head after you curl them with a hot styling appliance. Keep them bobby pinned until the curls have completely cooled down.
Great products for curls

Now that you’ve read a bunch of tips and tricks for taking care of your hair so you can get the best curl, here are some great products to help you. These products were all found on Etsy.com. They are all all-natural and handmade.
The amount of vitamins, caring oils, and beautiful scents that these products use are outstanding and they’re all super affordable. All the products listed below are $25 or less! Give these great hair products a try. Your locks will love you for it!
1. Hair Rinse:
Herbal Infused Apple Cider Vinegar Conditioning Hair Rinse – 4oz Concentrated – $5.00 – Shop: JuniperseedMarc:
“ It helps restore the pH balance of your hair after cleansing (which causes the scales on your hair shaft to stick out, like wool scales, snagging the hairs together and causing tangling and other damage), and helps get the scales to lie flat and smooth once again.” This product is to be used alongside a no-poo hair care routine.
2. No Poo:
VEGAN Natural Shampoo Bar – No Poo Method Hair Care – Tropical Exotic Scent – $6.00 – Shop: PuurBody:
“My natural shampoo bar uses a high proportion of coconut oil which produces rich lather and superior cleaning abilities. This natural shampoo has no SLS, no parabens, no alcohol. Just saponified oils which leave your hair and scalp naturally moisturized. As with the no-poo method; occasional Apple Cider Vinegar or baking soda rinses may be necessary depending on your hair type.”
3. Dry Shampoo:
(Brunettes)Mini Dark Dry Shampoo [Vegan, Organic, 100% Natural] – $3.50 – Shop: Urban Organics:
“Finally, a dry shampoo for brunettes! Not only will it leave your hair looking cleaner and more voluminous, but this formula gives brunettes a better solution than the standard white dry shampoo. Not to mention, your hair will smell like chocolate all day long.
It is best not to wash your hair too often so your scalp can restore its natural balance and produce the perfect amount of sebum for healthy hair. Twice a week is really all you need! This dry shampoo is the perfect thing to use between washes.”
(Blondes) Dry Shampoo, Shampoo Hair Powder, Vitamin b5 Shampoo with Organic Aloe Vera Extract, Italian Green Clay Shampoo – $11.00 – Shop: Artisan Bath and Body: “This dry shampoo contains aluminum free sodium bicarbonate, cosmetic grade corn starch, allantoin, zinc oxide, Pro-Vitamin B5, vitamin C, organic aloe leaf extract, Italian green clay and organic certified therapeutic grade essential oils and/ or fragrance if applies. “
4. Anti-frizz:
Marvi Glow Anti-Frizz Leave-in Conditioner Spray – 4oz – $25.00 – Shop: Marvi Beauty:
“Our hair is frequently exposed to mistreatment with normal styling, heating, and hair coloring. Chemical packed shampoo, styling solutions and hair sprays also keep our hair dry, weak and destroyed. Even the easy act of brushing and blow-drying can also cause hair breakage and deterioration.
Marvi Glow: Anti-Frizz Leave-In Conditioner is made with a combination of oils to moisturize and nourish hair, reversing the damaging effects. Frizz happens when dry, porous hair sucks up moisture in the air, causing the shaft to swell. This conditioner coats the hair shaft, making it harder for moisture to sink in.” This is awesome for that super frizzy curly hair!
5. Hot Oil Treatment:
Premium Hawaiian Scented All Hawaiian Oil Hot Oil Hair Treatment A Hawaiian Beauty Secret that really work! – $15.00 – Shop: D Medicine Woman: Made with Coconut oil, Macadamia nut oil, Kukui nut oil, Avocado oil, Aloe oil, Vitamin E oil, Cobalt Blue Bottle, Tuberose Oil, Puakenikeni Oil, Plumeria Oil, Pikake Oil, Hawaiian Gardenia Oil, Awapuhi White Ginger Oil.
“Our blend of coconut, macadamia nut, avocado, kukui nut, and aloe oils is, quite simply, the best. We balance these five oils to perfection to bring you a hot oil hair treatment that’s incredibly good for all types of hair. Yet, it leaves no greasy film, and won’t clog the pores on your scalp. And the therapeutic benefits of these oils are second to none.
The coconut oil alone (certified organic) is the closest match in nature to your body’s own, natural skin oil, called sebum. It also has a lactic acid content that is equaled only by human mother’s milk, so your scalp and hair will just love it. And the omega 7 oils in the macadamia nut are excellent to promote both skin and hair growth.
The avocado is oil is a natural skin toner, and is perfect for repairing scalp problems. The Kukui nut oil is native here to Hawaii and is also very therapeutic, enough so that one company here built an entire product line around it. Last but not least is aloe oil, and as you probably know is great for soothing and calming irritation on the skin, so perfect for the scalp and hair follicles.
Plus we add vitamin E so there are no worries about the oils deteriorating or going “bad”, for up to a full year. As a hot oil treatment for your hair, All-Hawaiian Oil moisturizes and feeds your scalp and hair, and is perfect to treat dry, damaged hair from winter’s drying effects. It’s an all-natural product, and so it’s totally safe.”
6. Hair Oil:
Hair Oil. 100% Natural. Vegan Hair Oil with Rosewood, Cedar, Frankincense and Patchouli// Wildwood – $25.00 – Shop: Miss Violet Lace: Made with Jojoba Oil, Grapeseed Oil, Sunflower Oil, Natural Preservative, Rosewood Essential Oil, Cedar Essential Oil, Frankincense Essential Oil, Patchouli Essential Oil.
“Nourish dry, parched strands with a few drops of our nutrient-rich hair oil. Formulated with all-natural plant based oils that are coveted for their hydrating and restorative properties.
Lightly fragranced with our Wildwood scent – a unisex woodsy scent that is appealing while applying, though it doesn’t linger, so it mixes well with other products.
Jojoba oil is believed to hydrate hair from inside the hair shaft, add volume and healthy shine to hair. Grapeseed and Sunflower oil are light, conditioning oils, making them great additives in our hair oil.”
7. Hairspray:
Non-Aerosol Orange Blossom Hairspray 2oz – $7.00 – Shop: The Holistic Science Co – Made with witch hazel, bamboo extract, panthenol, plant based keratin, orange blossom hydrosol, aloe vera, silk amino acids, and fruit nectar.
“This amazing, all-natural Orange Blossom Hairspray provides all hair types with natural, medium hold without stickiness, flakiness or buildup. Fine even mist keeps hair soft and manageable, tame flyaways, give hair a sleek finish and help tone down frizz in curly hair. Firm yet flexible medium hold, even in high humidity or wind.
Features plant-derived Keratin, Bamboo Extract, Provitamin B5 and Silk Amino Acids to condition and strengthen hair against breakage, boost softness and shine. This non-drying, non-toxic, aerosol-free formula keeps hair supple, healthy and beautiful! Tip: Spray on wet hair, scrunch and let it air dry for ultra-sexy beach waves. You’re welcome!”
We hope you learned some great ways to achieve beautiful curls and more ways to care for them. Be sure to give this article a thumbs-up and leave a comment below to share some of your hair care tips with us! We’d love to hear about it!


Add Comment