


We all know nail art is a big deal right now! But why the sudden surge of popularity? And since when did ordinary nail polish become boring? Well, the fact is, our nails have become more of an extension of our personality in recent years, and as the runways have shown us, nails have the potential to be our most effective accessory. It’s really unsurprising then that nail art is so on trend right now. After all, it’s a relatively inexpensive way to make a fashion statement and to show individuality.
Personally, I have a hard time neatly applying a humble coat of boring ol’ nail polish let alone attempting to draw fancy shmancy nail art designs! But, the good news is if, like me, you’re the furthest thing from Picasso, you don’t have to abandon the notion of getting creative with your nails altogether. That’s right, there are a myriad of easy nail art designs for every season that happen to look rather impressive – just perfect for the artistically challenged amongst us!
So freshen up for spring, take it brighter for the summer, get spooky during the fall and express your Christmas cheer in the winter with this ultimate guide to easy, seasonal nail art designs!
Easy Spring Nail Art Designs
Spring is all about pastels, floral prints and of course the sun coming out of winter hibernation. Take a look at these easy peasy nail art ideas to get your creative juices flowing this spring!
#1 Cloudy Skies

Let’s start off with something very simple to get raise our confidence levels, shall we? This spring-like cloudy skies manicure is easily created by applying a pastel blue polish for the base and painting the tips white. The beauty of this design is that you don’t need to be precise with the tips at all, in fact the more uneven the better; it’s the inconsistency that gives it its fluffy cloud effect!
#2 Pastel Tips
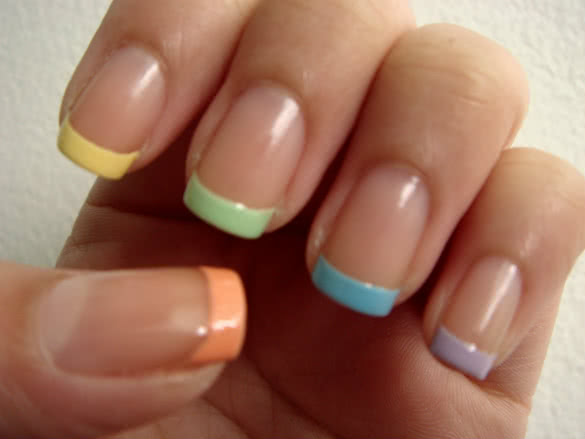
If you’ve mastered the cloudy skies manicure then practice your precision and apply creamy spring pastels on the tips of the nail only for an elegant and fresh spring manicure.
TIP: You can actually create perfect tips by sticking paper reinforcing rings at the base of the nails, paint the tip and then peel off the ring!)
#3 Spring Half-Moons
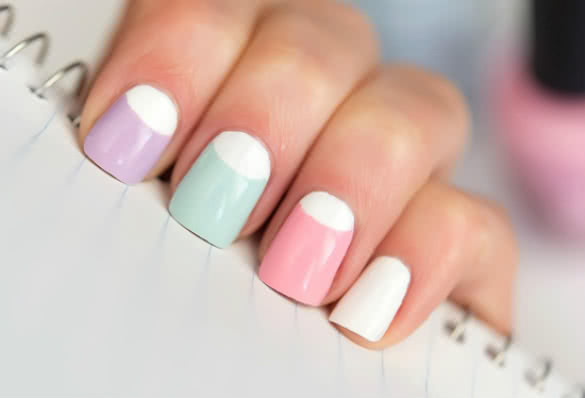
Playing with the half-moon of the nail has been fashionable since the ‘50s when women used to leave them polish free to prolong their manicures. Fast forward to 2014 and models of the spring runways are sporting ‘floating’ half-moons using white nail polish. You can emulate this runway trend with a true spring twist by painting the crescent white and the rest of the nail a pastel shade.
A great tip for creating perfect half-moons is to cut a paper reinforcing ring in half and place it at the base of the nail. You can then apply your base color and peel off the ring, you’ll be left with a perfect crescent shape to fill it in with your chosen color!
#4 Pastel Ombre
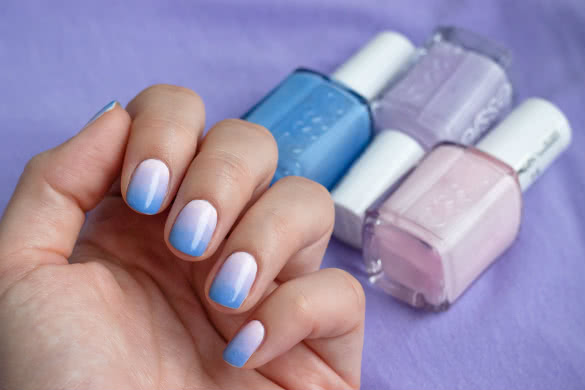
Ombre hair and clothing has been particularly fashionable recently, and ombre nails have naturally followed suit. This gradual change in color may seem complicated but it’s actually straightforward. Just choose 2 nail polish colors – pastels are good choices for spring – and follow these steps:
- Paint your nails with the base color of your choice.
- Now pour a little of both colors side by side.
- Using a toothpick, twirl the colors together.
- Take a sponge, dab it in to the polish and then onto the bottom of the nail. Repeat this with each nail.
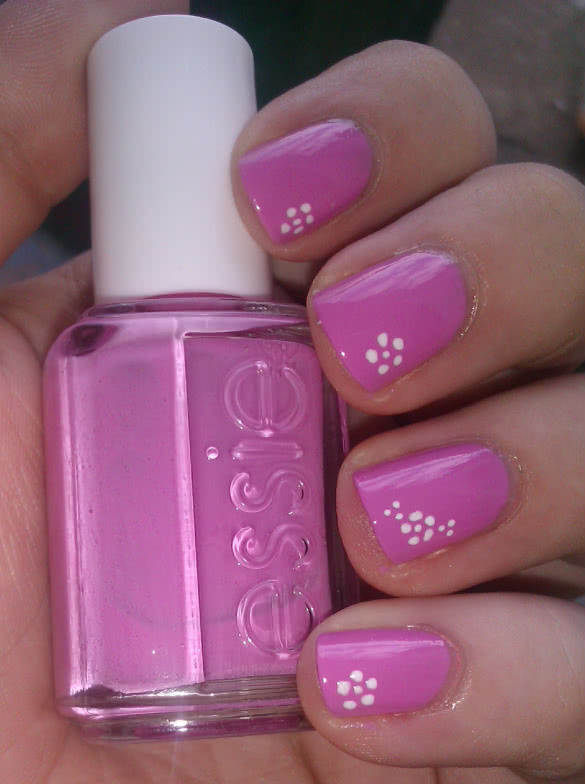
#5 Polka Dots
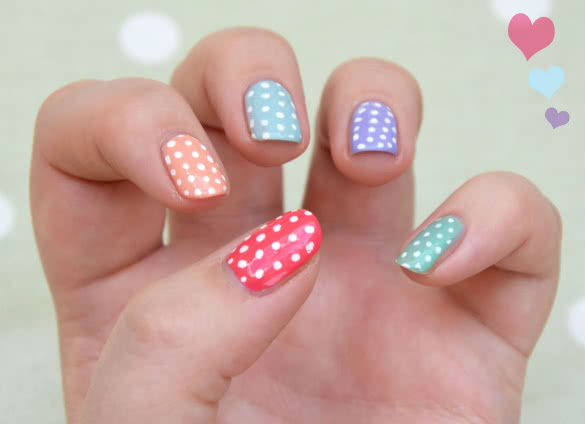
If there’s one design you can definitely master for spring, it’s the polka dot! Simple yet effective, pretty fresh polka dots really liven up boring plain nails. Not to mention there are numerous variations to try out!
Simply choose a base color, a color for the dots, and a dotting tool. If you don’t have one at hand, make your own by cutting off the end of a toothpick and dipping it into your polka dot color.
Don’t forget you can mix it up a bit by painting each nail a different color or applying different colored dots so play around with it.
#6 Spring Chevrons
The Chevron manicure has been particularly popular for the past few seasons, so give this easy design a trial run in some spring-like pastel colors. You can, of course, use a nail striper to get the chevron effect but I suggest checking out this tutorial, which shows you how to make your own chevron nail stickers using tape and some zigzag scissors:
#7 Floral
With daisies, buttercups and daffodils blooming all over the place, nothing says spring quite like a floral manicure. Understandably, ‘drawing’ flowers doesn’t seem like the easiest task! Well, actually it is…
For this pretty design, apply a base color. Using a dotting tool (seriously cheap on Ebay; my set just arrived ), use a dot of yellow for the center of the flower and a variety of different colors for the petals. If you would prefer smaller flowers then you can use the toothpick method instead.
Want a fancier look? Use a nail pen to draw simple white flowers on a bright base like these elegant talons.
#8 Easter Nails
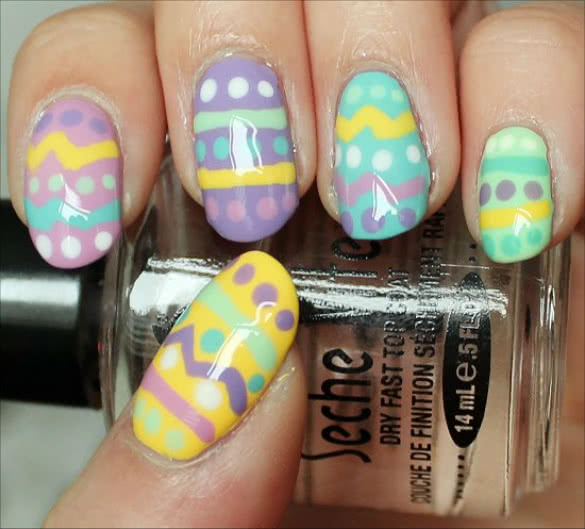
Of course, pretty pastel polishes like duck egg blue, new born chick yellow and mint green totally scream Easter and they are indeed pretty on their own, but why not jazz it up a bit and really get into the Easter spirit by trying out some easy Easter nail art?
Think of each nail as a different egg and use 5 different pastel colors for the base. Then use a nail striper to paint various zigzags and stripes in contrasting hues. Deceptively simple!
Chicks
If you want to keep it a little less fussy then try creating little Easter chicks as accent nails on your fourth finger.
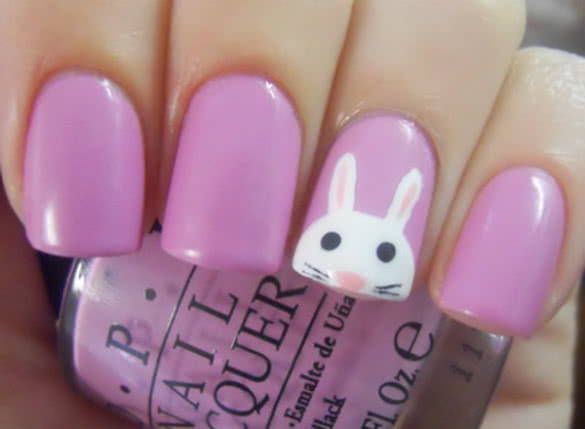
A pretty bunny accent nail is particularly effective – especially if you go with the white on pastel pink theme! Simply create a half-moon at the top of the nail; use a striper for the ears and a dotting tool (or toothpick) for the eyes and nose.
#9 Ladybugs
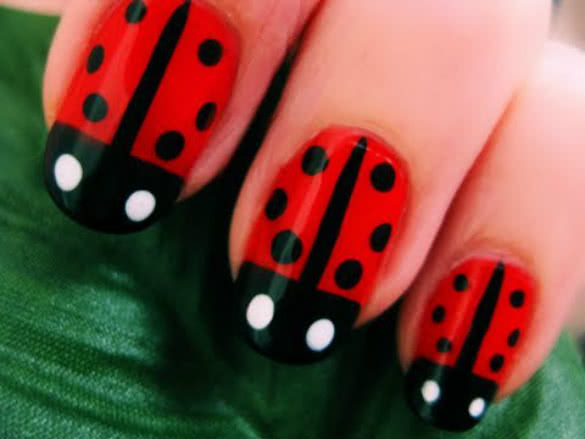
Why not try out some ladybug nails this spring? They’re cute, simple and you get to work on your newly acquired polka dot skills some more!
All you need is a red, black and white nail polish along with a black striper and a few bobby pins/toothpicks to create the spots.
#10 Bumble Bees

Craft these adorable bumble bee nails by applying a coat of yellow polish and using a black nail striper.
Easy Summer Nail Art Designs
Summer: Sun, sea and sand; plenty of inspiration for some summer nail art!
#1 Sunshine
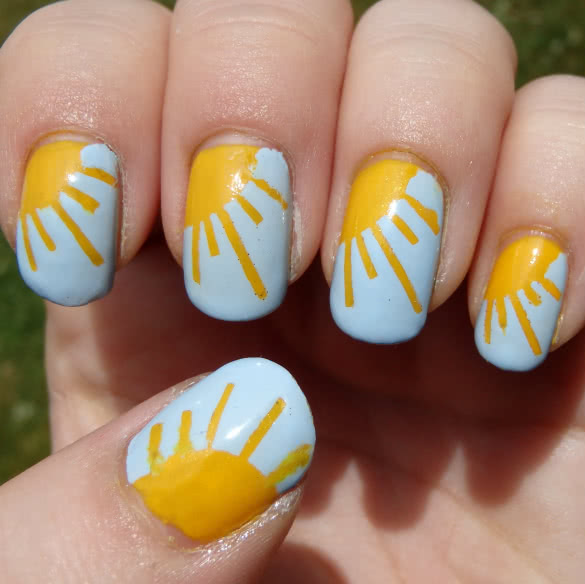
As literal as this summer design is, it’s nevertheless super cute and very easy! Use a sky blue polish such as Barry M Polish in Cyan Blue 294 for the base, a yellow like China Glaze Happy Go Lucky for the sun, and a nail striper for the rays.
#2 Melted Ice Cream
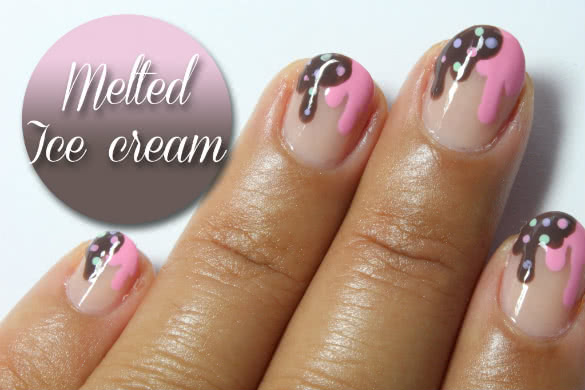
These ice cream nails are adorable and look good enough to eat, but of course they’re simple to create or they wouldn’t be in this guide!
#3 Popsicles
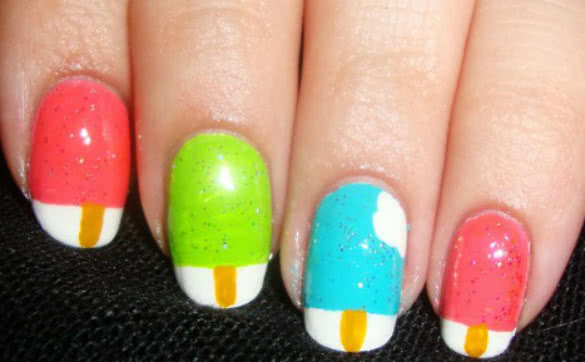
We all love a refreshing popsicle in the heat and they’re a definite symbol of summer! So give these amazing popsicle nails a go!
Apply whatever color you like to each nail, and make a white French tip. Add in the little popsicle stick with a nail striper and add a top coat of clear glitter! The half-eaten popsicle is especially cute on the fourth finger and it’s easily created by just applying a little blob of white in the lower corner.
#4 Tribal
The tribal print has been on trend for the past few summers and can be seen on everything from maxi dresses to flip flops. Trying it out on your nails may indeed seem difficult, but it’s actually very similar to the spring Easter egg design – all you need is a nail pen and a steady hand! Take a look at this easy tutorial:
#5 Neon Half-Moon
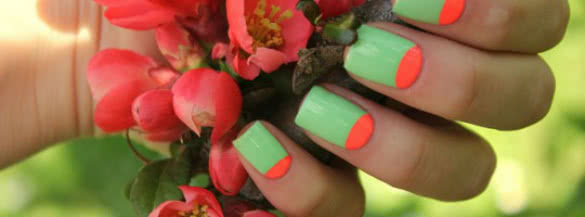
There’s no better time of the year to flaunt bold neon nails than against your gorgeous summer tan. But if painting your nails vivid pink or green is too bright for you then why not just paint your half-moon in a neon shade for a subtler effect (use the paper reinforcing ring trick as said above).
#6 Lemon Half-Moon
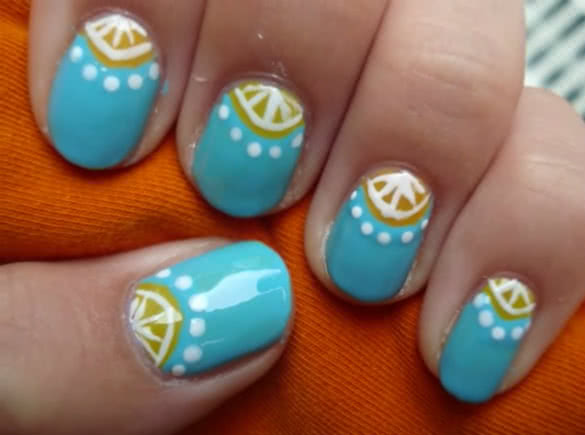
Taking the half-moon manicure to new summery heights, these lemon and lime half-moon nails are fabulous! Just use a white polish and nail striper to draw on the slices!
#7 Gingham
You know summer has officially arrived when you rustle out that gingham blanket for a picnic of scones and strawberries and cream (speaking of strawberries, see the cute strawberry nails in the below), but I bet you didn’t realize that it’s actually super easy to get the gingham effect on your nails as well. This design involves a nail striper or you can paint scotch tape like this tutorial here:
#8 Strawberries
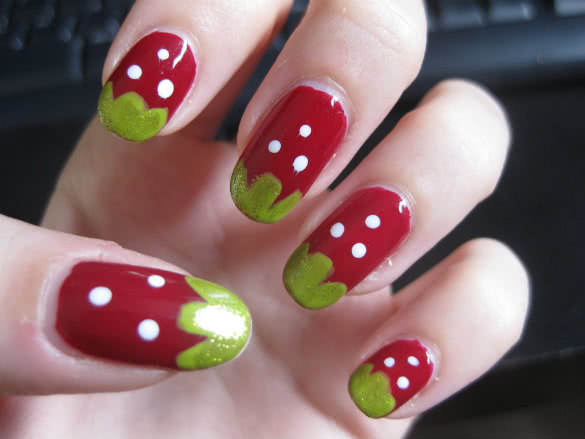
Turn your fingers into delightful little strawberries with a toothpick/dotting tool and red, green and white nail polish.
#9 Watermelons
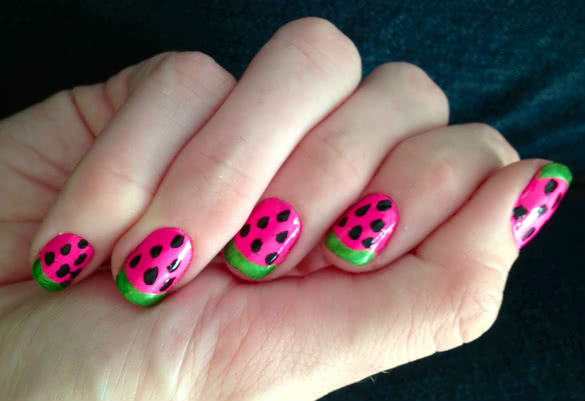
The wonderfully refreshing watermelon is a winner during the hot summer months, and their colorful red and green contrast makes for a pretty summer nail design, too!
#10 Nautical
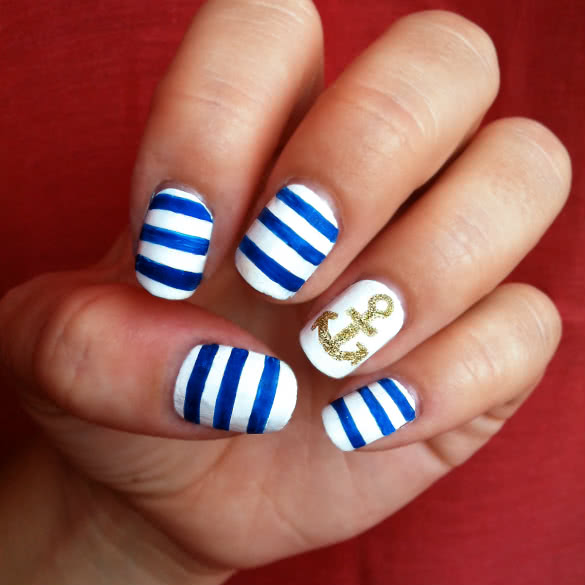
Ahoy there ladies! If you love the nautical theme then there’s no better time to embrace it than summer!
Paint your nails white, use a striper or tape for the navy stripes and create a cute little anchor for the accent nails.
#11 Beach
These beach-themed nails are perfect for your summer holiday. Create the ombre effect with a blue and sandy colored polish (see the ombre tips above). Then, simply sponge on a little white polish for the foam of the waves. Voilá! Easy beach nails completed!
#12 Palm Trees
It’s time to get the toothpick out again for these beautiful palm tree nails! Simply dip your toothpick into the polish for each branch of the palm tree. See how it’s done:
#13 Sunset Ombre
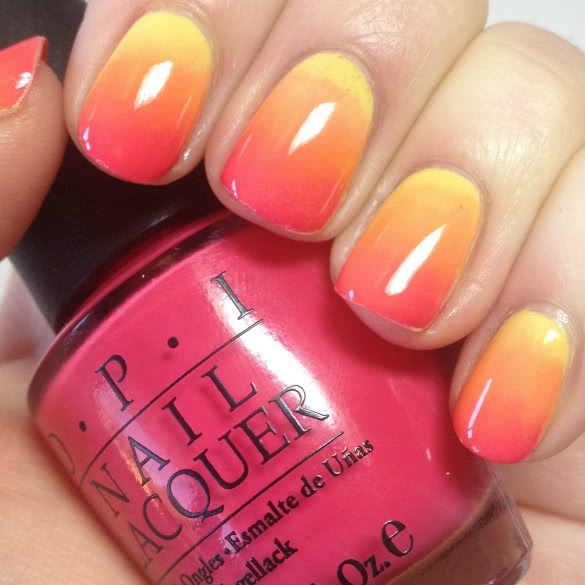
Summer days may be gloriously bright and blissfully long but let’s not forget those beautiful summer sunsets that signal the end of the day (if you’re lucky you happen to be watching said sun set on the on a tropical island). Once again just follow the ombre steps with orange and yellow polish.
Easy Autumn Nail Art Designs
Think bronze, burnt orange, yellow and red hues. The autumn palette is gorgeous! You can even mix it up this season with some quirky Halloween nail art designs!
#1 Autumn Ombre
Give a nod to beautiful autumn colors with a simple autumn ombre manicure. Just choose some autumnal shades and follow the ombre tips above!
#2 Autumn Trees
These beautiful tree nails involve painting your nails a dark red shade and creating an ombre effect with yellow polish. You can then paint the simple trees on top using black nail polish or acrylic paint.
#3 Autumn Leaves
Cute autumn leaves are easily made using a nail brush or a striper tool.
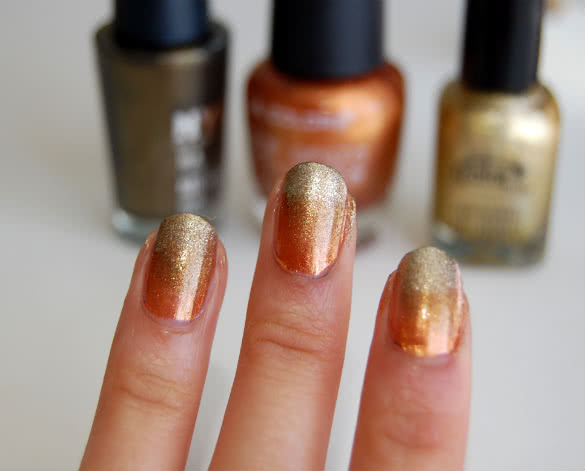
#4 Autumnal Stripes
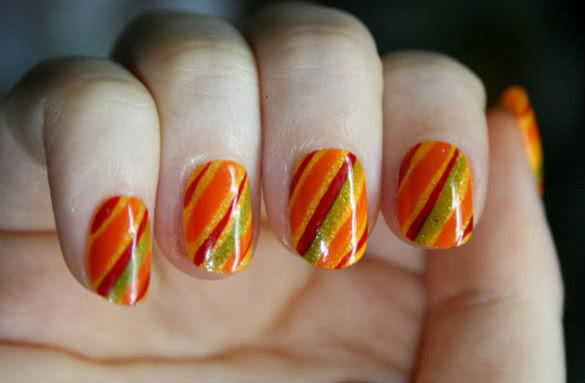
Simply start off with a coat of gold then add some stripes in various autumnal colors. Mix it up with glitter polishes and vibrant oranges or dress it down with dark greens and reds.
#5 Autumn Marble Effect
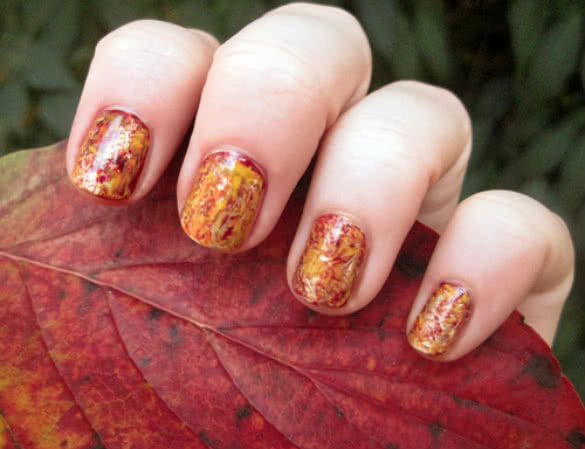
This beautiful marble manicure is easily done by using 3 or 4 autumn nail colored polishes such as red, orange and gold as well as crumpled up plastic wrap! Apply your base color, allow it to dry, then apply your second color, and use the plastic to dab at the wet polish. This will create the marbled effect. Simply continue the process with the remaining colors. Beautiful!
#6 Owls
Our feathered friend the owl is awfully fashionable right now. Frequently seen printed on clothing and as the subject for quirky earrings, why not try an owl nail art design on your nails, too? This simple tutorial shows us how to do it using nothing but a dotting tool!
#7 Spooky Eyes
Halloween is the perfect time to have some real fun with your nails, so let’s have a look at some simple Halloween nail art. Starting off with by far the most effortless nail design of them all, these spooky eyes are so effective! You only need 2 nail colors and 2 different sized dotting tools.
#8 Pumpkins
These cute pumpkin nails may seem a little tricky but you’ll soon see they are incredibly easy to craft!
#9 French Pumpkins
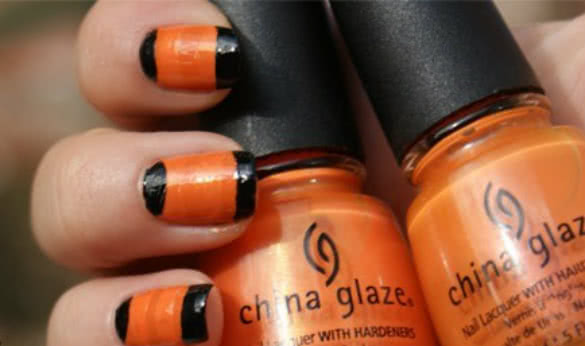
If drawing pumpkins on your nails is a little too literal and you want a subtler look, try out this French pumpkin manicure with an orange base and black tips and half-moons. Alternatively, paint the crescent green for a true pumpkin feel!
#10 Candy Corn

Candy corn nails can be created by painting the nails a coat of orange, applying a strip of tape in the center of each nail, and painting yellow and white on either side of it. Simply remove the tape and you’re all done!
#11 Blood Splattered
Incredibly easy to do – albeit very messy – these blood splattered nails only involve 2 nail colors, some tape and a straw.
#12 Thanksgiving Turkey
Of course, I haven’t forgotten Thanksgiving inspired nails! MissJenFabulous shows us how to create this easy feathery turkey manicure with a nail striper and dotting tool.
Easy Winter Nail Art Designs
Crisp frosty mornings, snuggly sweaters, cosy fires and the spirit of Christmas in the air…. There are plenty of reasons to love winter, and so many simple and beautiful winter nail designs for you to show off, too (when you do happen to remove your hands from your mittens, that is).
#1 Snowflakes
Let’s start off with some chilly manicures to get us in the mood for the plummeting temperatures. These snowflake nails are a lot easier to create than you might think. All you need is a white nail polish and a steady hand!
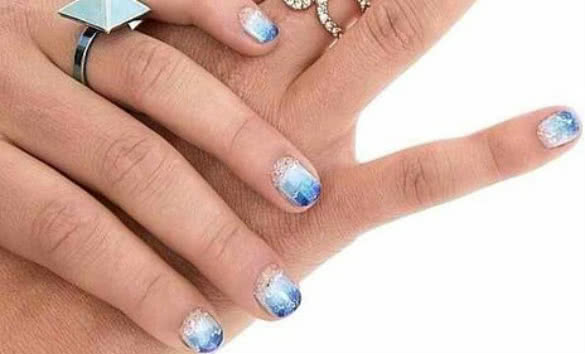
#2 Icicles
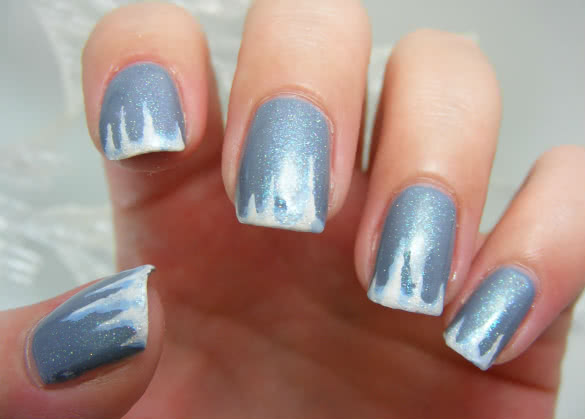
Much like the spring cloudy skies manicure, icicle nails are also easily created using a shimmery blue base coat like OPI’s I Don’t Give a Rotterdam and a white nail striper for the icicle tips.
#3 Snowmen
These snowmen nails are so cute and this tutorial is by far the simplest snowmen nail tutorial I’ve come across.
This snowman manicure is also very effective and easily created using a dotting tool and a striper.
#4 Simple Snow
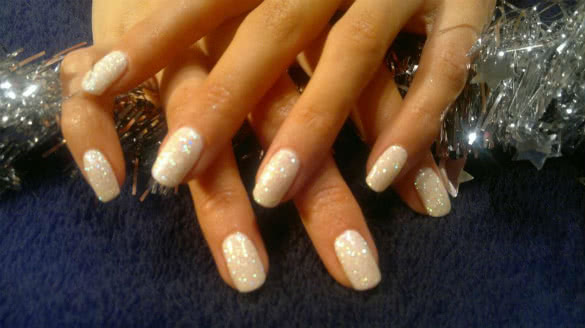
If you’d rather go for a more understated design then try out these snowy nails. They’re less obvious, but definitely still in keeping with the season! All you need to do is paint on 2 coats of a white polish like OPI’s Alpine Snow and throw on some glitter from a craft store!
#5 Ice Blue Glitter
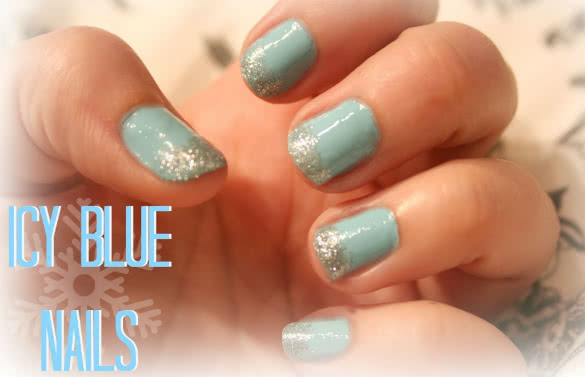
Another beautiful but subtle winter look is the simple touch of a blue glitter polish like Essie Stroke of Brilliance at the top of ice blue nails.
#6 Winter Ombre
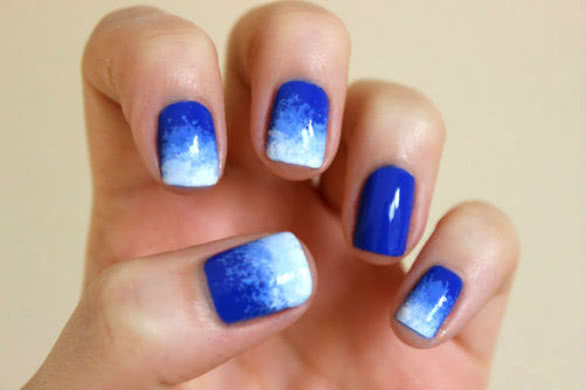
Using just 2 colors, paint your nails blue then sponge on the white at the tip. Simple!
#7 Candy Canes
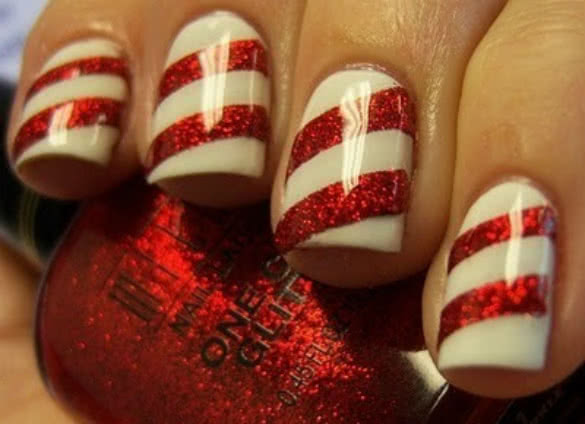
A base of white nail polish and 2 stripes of red glitter polish is all it takes to create perfect candy cane nails; perfect for a Christmas party!
#8 Santa Hats
Grab some tape and a dotting tool and try out these Santa hat nails. Why not also try out this design with green nail polish instead to create elf nails!
#9 Christmas Trees
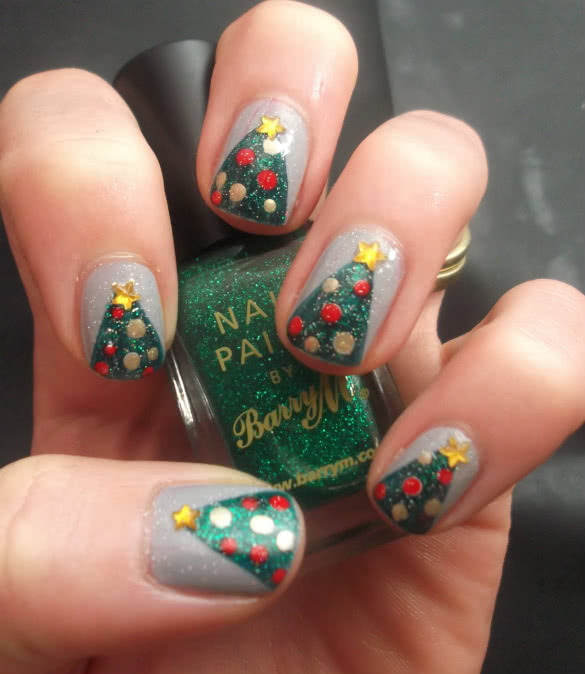
These sparkly Christmas trees are super easy! Just use the same tape technique used for the Santa hats, add a brush of green glitter polish and add some rhinestones for the stars
#10 Fair Isle
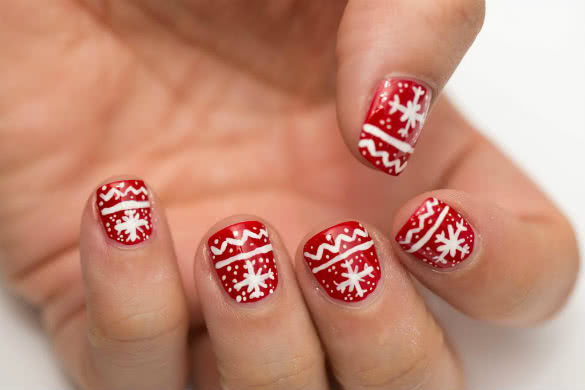
Don’t you just adore those gorgeous Fair Isle print Christmas jumpers? They have become especially popular over the last couple of years and undoubtedly epitomize the festive season! So why not create that classic holiday print on your nails this Christmas? It’s surprisingly easy to do with 2 colors and a nail art pen/toothpick.
#11 Gingerbread
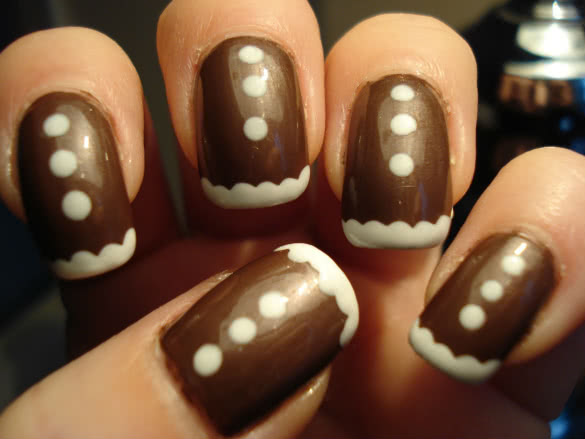
This is without a doubt the most adorable manicure I’ve ever seen, mainly because I just love gingerbread, but seriously, I tried this design out the minute I saw it and it really is easy to create! Simply use a chocolate brown polish for the base and a dotting tool for the white buttons and tips!
You see: With a few simple tips and tricks, you too can be an artist and express yourself through your nails! Do you feel inspired? Well then get practicing!
Cover photo: tumblr.com


These are awesome! I don’t know if I could pull off all ten (I have small nails and don’t like to over polish) but I love the idea of doing 8 in one color and then my fourth fingers with one (or all) of these awesome designs!
These are stunning designs..! Thank you :D They look soo amazing. , i love the Candy Corn and Fair Isle nails very much.! Also the users on the community here will love it.