Here are 10 yoga poses for beginners you can start doing every day at home to get familiar with some of the basics of yoga. These poses help you both physically and emotionally, so get ready to feel and look great! The second names of the poses listed are their sanskrit names. Sanskrit was the first written language and it’s over 4,000 years old.
Yoga is an ancient science that unlocks the secrets of the mind and body to reach true oneness with the universal life force and find sustained happiness. Essentially, it’s epic, and these yoga poses for beginners can welcome you into this world.
While you’re doing these poses, it’s important to breathe only through your nose. You should try to constrict the muscle in the back of your throat to make an audible breath. Essentially, this slow and deep breathing is just as important as the pose itself.
You are releasing toxins from your body as you breathe and you are sending oxygen to your entire body, which builds stronger bones and muscles, not to mention helps you feel energized and clear headed.
1. Warrior 1 (Virabhadrasana A)
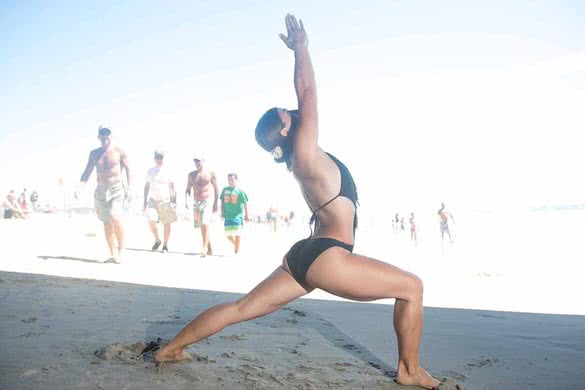
Photo of Shannon Yrizarry by John Higgins
This pose will open up your hips and tone your stomach and shoulders while lengthening your calf muscles. Start this pose by standing sideways with your feet about 3 to 4 feet apart. Turn the toes on your right foot forward and your left toes in a lot as the picture shows. Your hips should both point forward and not to one side.
To start, you may need to shorten your stance to keep your hips in one line and your back foot on the ground. Make sure your feet are not crisscrossed. As you bend your front knee, don’t let your knee pass your ankle. If it does, lengthen your stance. The goal is to stack your knee directly over the ankle to protect the joint.
To get the sway out of your lower back, point your tailbone down and pull your front ribs in. Reach your arms up in the air. Hold this pose for three long rounds of breath and breathe slowly through your nose. Then repeat the same thing on the other side.
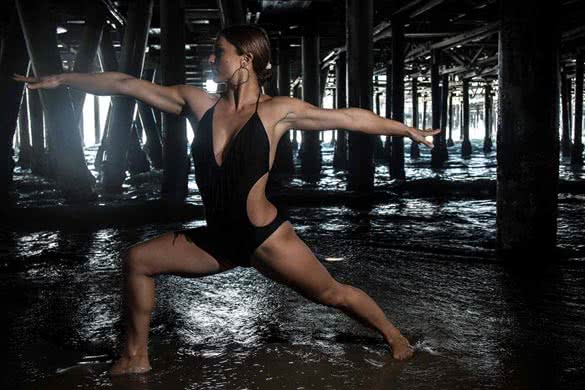
2. Warrior 2 (Virabhadrasana B)
Photo of Shannon Yrizarry by John Higgins
Warrior 2 pose is another standing hip opening pose similar to warrior 1, but your hips will be open to the side. If you really engage your muscles properly, it will help you burn fat. When you’re sitting during the day, driving to work and at your desk, the blood flow is constricted through your hip area to the bottom half of your body.
Stretching your hips will improve the health of your reproductive organs as well as your knees, ankles and feet.
Stand facing sideways with your feet wide apart. Turn your right toes forward and your left toes in only slightly. Bend into your right knee and if your knee passes your front ankle, lengthen your stance so the knee stacks directly over your ankle. Now reach your arms in opposition with your shoulders, stacked directly over your hips.
Gaze forward over your right fingers and keep your arms reaching in opposite directions. Bring your shoulders away from your ears and slightly lift the front of your chest. Pull your lower belly in and sink those hips a little lower. Do you feel that hip stretch? Don’t forget to breathe!
Take three long and deep breaths through your nose and then repeat the same thing on your left side. Make sure you do both sides and hold both sides equally, so you develop muscles in a balanced way that will keep your spine straight.
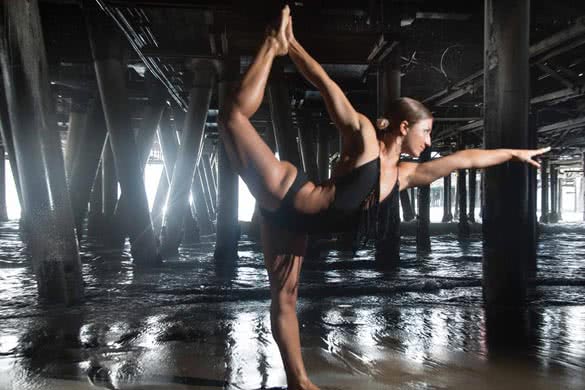
3. Dancer’s pose
Photo of Shannon Yrizarry by John Higgins
Dancer’s pose is one of my favorite poses because it gives you a good amount of energy. It also improves your ability to focus while getting rid of hunched posture. As you stretch your spine open, you will feel invigorated and ready to conquer the world, or at least clean out your closet!
Start by standing with your feet together and your hands at your sides. You may want to stand next to a wall for balance when you’re first starting out, but I think you’ve got this! Bend your right knee and turn your right palm up. Grab the inside of your foot (this allows your right shoulder to roll open). Next, bring your knees back together and lift your left hand forward for counterweight like a tightrope walker.
Keeping your chest lifted, begin to kick into your back hand. Keep your right hip down at the same height as your left and keep your chest and gaze up. Breathing will help you balance. Keep your gaze on one non-moving point and hold the pose for 3 long rounds of breath.
The breath will take some getting used to, but eventually, your body will naturally engage what is called the ujjayi breath. It sounds like waves crashing onto the beach when you breathe. Ujjayi translated means victorious breath.
After you come out of the pose, repeat the same process on the left side. You will notice your back and shoulder flexibility getting better if you do this every day. Have fun with it and don’t be critical of yourself. Remember, yoga is not for flexible people, you do yoga for your health and mind and flexibility is a bi-product!
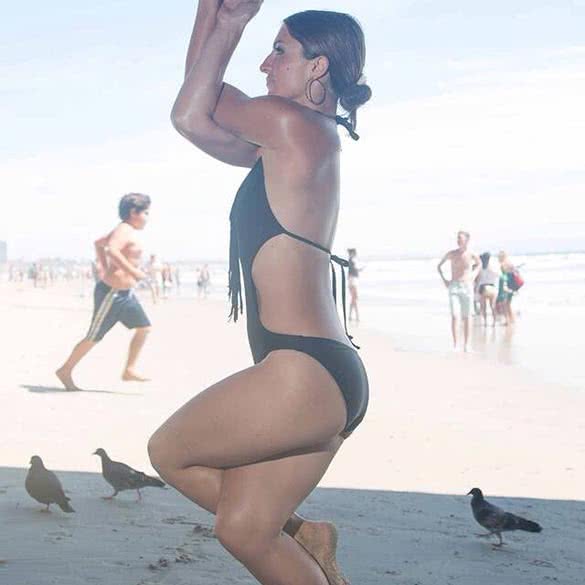
4. Eagle pose (Garudasana)
Photo of Shannon Yrizarry by John Higgins
This pose is amazing because it strengthens your immune system and improves your circulation. You are creating a tourniquet with your arms and legs to cut off blood flow temporarily. When you release the pose, the fresh blood will rush in to heal those areas and send extra blood supply there. You may need to modify the pose when you’re first starting out. I know I did!
Stand with your feet hip distance apart and sit back into an invisible chair. Lift your arms above your head. Lift your right leg up and over your left leg and either balance on with your right toe by creating a kickstand or see if your right foot will begin to tuck behind your left leg. Don’t worry if you can’t tuck your foot behind your leg, it took me a long time.
Next, swing your right arm under your left and press your arms together at the elbows. Lift your hands and see if you can get your palms to meet. If your shoulders are tight, you can also modify by hugging opposite shoulders. The tendency will be to lean forward but your goal is to keep your torso upright and stack your shoulders over your hips.
Try to lift your elbows up to shoulder height and push your hands away from your face. Finally, compress your legs by sitting lower. Hold for 3 rounds of breath and repeat the process on the left side.
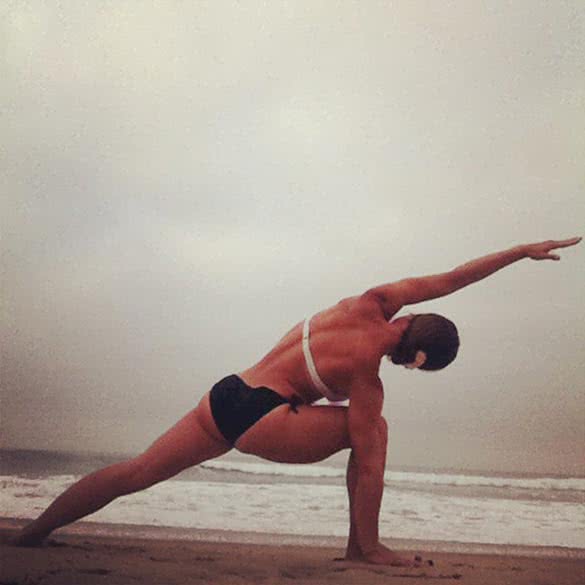
5. Extended side angle (Utthita Parsvakonasana)
Photo of Shannon Yrizarry
This pose helps to burn away those love handles, ladies! It also lengthens your muscles and opens up the hips. Start out in warrior 2 pose, as described above, and then lower your right elbow to your right knee. Keep your lower belly pulling in and reach your left hand up so your arms are in one line. Next, stretch your fingertips on your left hand forward so your left arm is reaching over your left ear.
You will feel a stretch into your left side and do your best to keep the back edge of your left foot down so you really stretch the whole left side of your body. Hold for 3 rounds of breath and then repeat the process on the left side.
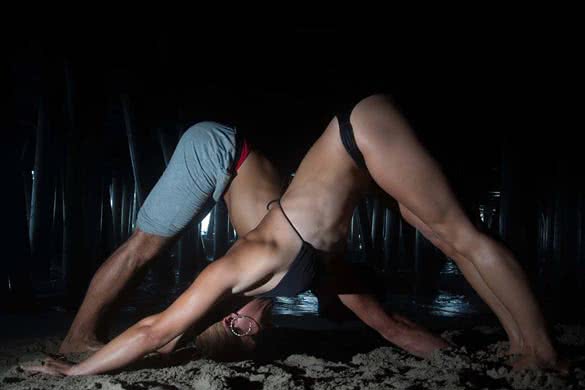
6. Downward facing dog (Adho Mukha Svanasana)
Oleg Flow and Shannon Yrizarry: Photo By John Higgins
Most of us have heard of downward facing dog, but it’s often done completely wrong. So here is how to do it without hurting yourself and getting maximum benefit. As your heart is elevated above your head you will improve your immune system’s function, your brain function and the lymphatic system, which is in charge of removing viruses from your body. This pose will also help give your face a healthy glow!
Start on your hands and knees with your hands on the ground under your shoulders, and knees hip distance apart. Tuck your toes under and lift your hips so your body makes a triangle with the ground. Press your heart toward your thighs and push your heels towards the ground.
Make sure your fingers are spread as wide as possible and press your fingers and hands down firmly. Move your shoulders away from your ears and take three deep breaths.
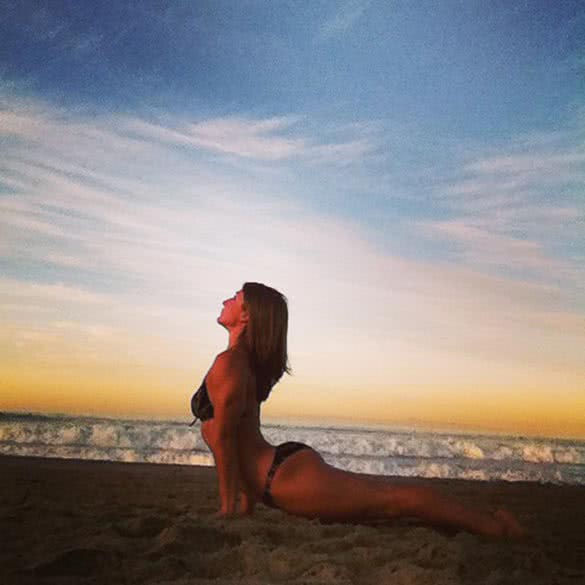
7. Upward facing dog (Urdhva Mukha Svanasana)
Photo of Shannon Yrizarry
This common yoga pose helps you get energy that is stored in your spine and it helps reduce the hunched over posture caused by our daily lifestyle. Start by lying on your stomach with your hands on the ground under your shoulders. Separate your legs ever so slightly with the tops of your feet on the ground. If you tuck your toes it will hurt your lower back, trust me!
Next, press into your hands and pull your chest forward and up. Your hips will lift up off the ground and be sure to pull your shoulders down and back away from your ears. Don’t let your thumbs lift up, keep pressing firmly through your hands so they stay flat. Pull your lower belly in to protect your lower back and don’t forget to breathe!
Hold this pose for three breaths, and if you can’t straighten your arms yet, just come up half way while you work on your spine flexibility. There’s no shame in being a beginner! Don’t compare yourself to others, it’s not a competition. In yoga we are all equal.
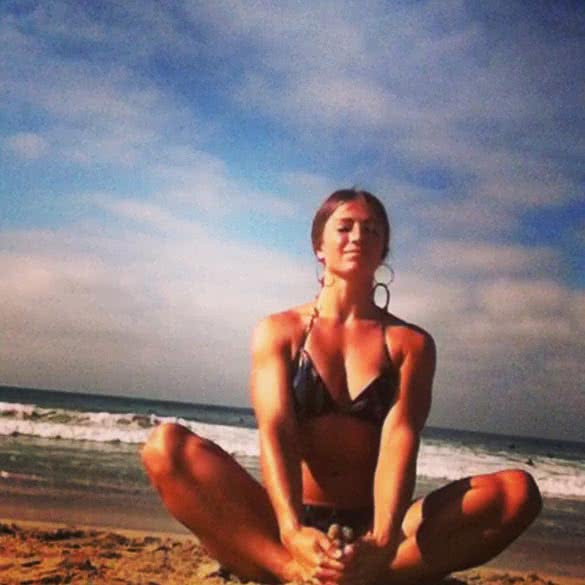
8. Butterfly pose (Baddha Konasana)
Photo of Shannon Yrizarry
This pose is actually great for women, because when you lean forward, it can help reduce cramping. Begin seated and bring the soles of your feet together. Interlace your hands under your feet and press the bottoms of your feet together. Pull your feet in as close to you as you can. Press your elbows into your knees and pull your nose towards your toes.
This pose helps to open the inner hamstrings and is a nice release for your lower back. Hold the pose for 5 rounds of ujjayi breath.
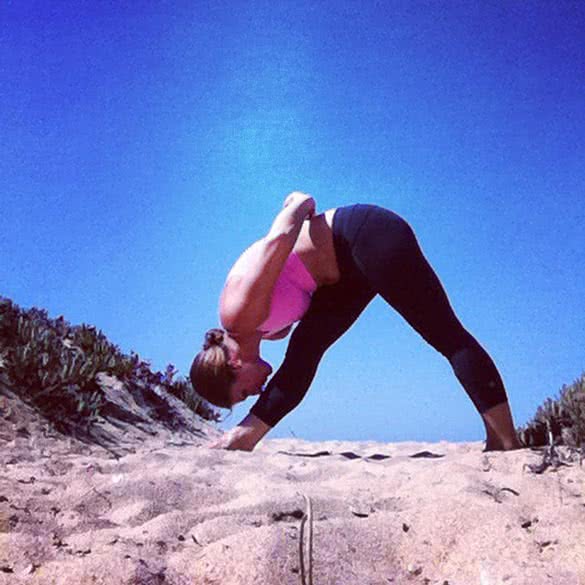
9. Pyramid pose (Parsvottanasana)
Photo of Shannon Yrizarry
This pose can really help reduce your back pain. Often back pain is caused by tight hamstrings which pull on your back. Begin by standing sideways with your feet about 2 ½ to 3 feet apart. Turn your right toes forward and your left toes in a lot. Your hips should be pointing directly forward and in one line. Press your fists together behind your back and keep your legs straight and engaged.
Lean your torso over your right leg and try to bring your nose towards your right shin. Spin your right hip up and back and your left hip forward and down. Your goal is to get the hips level with the ground so the left hip isn’t popping up. Take 3 deep breaths and repeat the same thing on the left side.
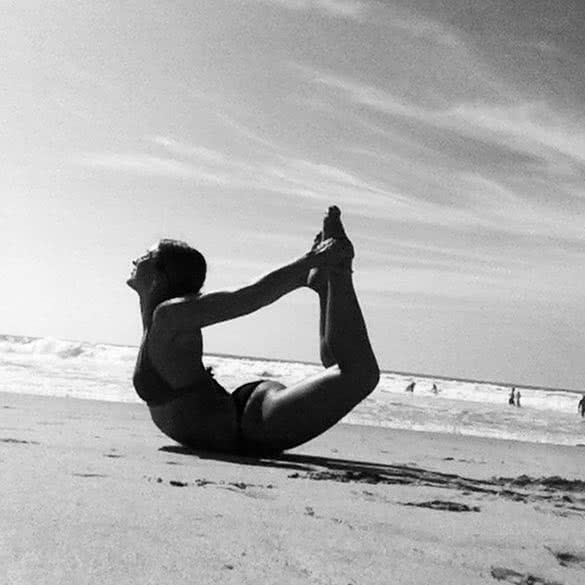
10. Bow pose (Dhanurasana)
Photo of Shannon Yrizarry
I tell my students that this is their five hour energy drink! This pose is a great way to release the energy pockets stored in your spine. Begin by lying on your stomach and bend your knees. Reach back and grab the outsides of your feet, then let all the air out of your lungs. As you breathe in, kick into your hands to lift your chest.
Keep pulling your knees closer together and your shoulder blades closer together as you lift the gaze and take small sips of air. It will be much harder if you hold your breath, so don’t do that. Hold the pose for about twenty seconds and relax. You’ll feel the energy moving through your back. If you can’t reach your feet, you could use a belt, towel or tie around the tops of your feet, and hold it with your hands.
Make sure you lie down for 5-10 minutes completely still after you practice to get that amazing relaxed and happy feeling. This is the most important part, and even though it feels like you’re doing nothing, you won’t get the same happy chemical release if you skip this crucial part!
The dead man’s pose (savasana), as they call it, will let you relax and recover your energy. If you practice these beginners poses every day, you will notice a difference after a few days.
Good luck on your journey to your most vibrant self through yoga practice…remember to share this with your girlfriends and visit us again soon for more fun and empowering articles here on YouQueen.






Add Comment